
The Cellar: a friendly neighborhood coffee shop, with no coffee and no shop. Established 1990.

- xoxoxoBruce
- The Future is Unwritten
 Offline
 - Registered: 10/15/2020
- Posts: 4,355
Re: Adventures of Home Ownership
Run the wires into a box with two double outlets, then get 4 ft LED lights.
They can be bought from Harbor Freight for less than $20 each.
They have a cord and plug in, a pull chain switch in case you don't have a wall switch but you probably do.
They are brighter than a fluorescent and use way less power .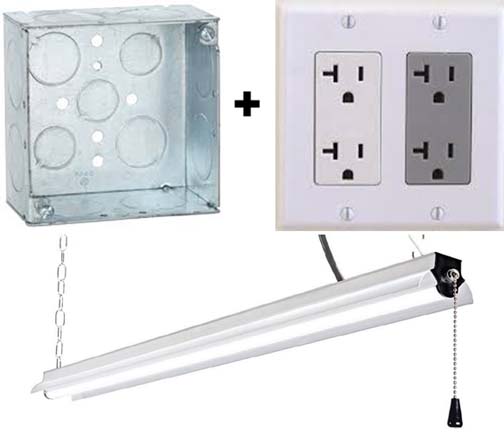
I love these lights, junked all the fluorescents.
I wonder if the wiring out to and inside the torture chamber is undersized causing an increase in amperage melting the transformers?
The LEDs draw so little it shouldn't be a problem.
Oh, most LEDs daisy chain too, plug one into another one so further from the plug,
Last edited by xoxoxoBruce (4/29/2022 10:07 pm)
Freedom is just another word for nothin' left to lose.
- bbro
- Member
Offline
- Registered: 10/15/2020
- Posts: 462
Re: Adventures of Home Ownership
I already bought lights I was going to use. They're LED and connect.
Prepare yourselves for the adventure of "are you fucking kidding me".
So, I went to Lowes, got a small metal junction box and cover, some wire nuts (to make sure I had the right size), a current tester, and some electrical tape. I got home and got to work. I confirmed the tester showed voltage on the wire to the light, shut off the breaker, and tested to make sure that the wire didn't register anymore.
I started trying to open the light fixture (the metal part under the actual light bulbs). And wouldn't you know it, the fucking screw kept turning and not doing anything. I switched sides and had better luck, to a point. That's when I found this mess
And after I removed the ballast
So glad I decided to take the risk and remove the light. The wiring itself was pretty self explanatory, but of course it wasn't straight forward. There's a gasket in the side of the light where the external wires go into the light. THEY PUT IT IN UPSIDE DOWN! So, the little tab that you need to press in to get it the fuck out, was up against the metal. I had a little thing that's basically a circle of metal with part pointing straight ____O <kind of like that, but connected. I don't know where I got them, but I have a couple. I was able to use that to get the wires out.
All the old stuff was down, so it was time to install the box. I started doubting that the box I got was the correct one. My brother was able to help me over the phone and I started drilling holes to secure it. And this fucking happened
Yep - that's my drill bit. There's still part of it forever in that piece of wood. After much swearing and deep breaths, I was able to get it secured and put the cover on. Before you ask, the wires have wire nuts on them and the ground is wound around a machine screw in the box. I also used some electrical tape to extra secure the wire nuts.
Booya bitches
The rest of it was easy as hell comparatively. The only tough part was moving the ladder.
From the door:
From the back wall:
It's still a little dark back there, but it's more tedious than hard to change. I think I'll take a break for a while and just enjoy non-florescent lights.....and look for new ones for the garage....
- •
- xoxoxoBruce
- The Future is Unwritten
Offline
- Registered: 10/15/2020
- Posts: 4,355
Re: Adventures of Home Ownership
Applause, encore, applause author, whistle, cheer, stomp. bravo... Sounds to me like you done good.
Tape on the wire nuts, I do that too if it's being closed up hopefully for good. The thing that bothers me about wire nuts it you snug them up and can't pull them off, but turn them back about one degree and they're loose. Tape may be belt and suspenders but can't hurt.
Freedom is just another word for nothin' left to lose.
- bbro
- Member
Offline
- Registered: 10/15/2020
- Posts: 462
Re: Adventures of Home Ownership
Thanks Bruce. At this point, I'm wondering if I should put this stuff in the DIY thread. There's some wood in the ceiling of the garage that seems like it was put up there for storage. Since I've taken everything down (I think), I am debating getting the wood to see if I can use it for some projects. The ceiling is very high, though (see picture here: ). Makes me very nervous. I was considering getting a safety harness and stuff, but I wonder if I'm overdoing it.
- •
- xoxoxoBruce
- The Future is Unwritten
Offline
- Registered: 10/15/2020
- Posts: 4,355
Re: Adventures of Home Ownership
Can never overdo being safe, especially if you're working alone. Safety gear is for #1 preventing you getting hurt, and #2 which can be equally important is make you feel comfortable and able to enjoy what you're doing.
If you want to move in all down to floor level in one shot you can wait for someone to come help... well be there.
So you think the lumber was put up there to store it rather than store things on it. Really doesn't matter it's your wood now, you can have your way with it.
Freedom is just another word for nothin' left to lose.
- bbro
- Member
Offline
- Registered: 10/15/2020
- Posts: 462
Re: Adventures of Home Ownership
I just wish safety gear wasn't so expensive! My brother is coming down in a couple weeks, so I might see if he can help.
It was definitely used for storage. The plywood makes sense for that, but I swear I saw some 2x4s up there. I have to see the condition of it before I decide what to do with it. I want to make a storage cabinet, but it'll hold all the dog stuff, so shit wood won't work.


- •
- bbro
- Member
Offline
- Registered: 10/15/2020
- Posts: 462
Re: Adventures of Home Ownership
So, there were 2x4s on the other side. I got up there and they're all dirty with a little water damage. Basically, they left me their trash wood. But since what I need it for right now is gonna be something outside, I don't care what it looks like. The inside looks good, so I'm gonna use them. I tried using my dremel router attachment on them, but it didn't work very well, so I have to figure something else. I'm thinking of using chisels.....
Also, the ceiling is 10 ft high. I measured this time.
- •
- xoxoxoBruce
- The Future is Unwritten
Offline
- Registered: 10/15/2020
- Posts: 4,355
Re: Adventures of Home Ownership
10 feet is about 5 times as high as you want to drop and land on your feet.
Dremel? Chisels? To do what, cut the pieces to length?
Saws are cheap, handsaw for $10, one of those amazing Jap saws for $15, Harbor Freight small sawzall for $20...
or a Titan 21 inch hydraulic for $2,539. Just kidding.
But having a saw in your bag of tricks will pay dividends down the road. Expanded capability will give you flexibility in decision making.
Freedom is just another word for nothin' left to lose.
- bbro
- Member
Offline
- Registered: 10/15/2020
- Posts: 462
Re: Adventures of Home Ownership
No - the dremel and chisel are to carve out a 1/2 inch slot for a fence panel to slide in. I have a jigsaw already.
- •
- xoxoxoBruce
- The Future is Unwritten
Offline
- Registered: 10/15/2020
- Posts: 4,355
Re: Adventures of Home Ownership
Oh, ok. Chisels would be labor intensive to put it mildly, although two or more saw cuts and knocking out the center with a chisel is cool. Since you don't have a saw that can cut depth drilling a series of holes and cleaning up with a chisel would be the next best.
Freedom is just another word for nothin' left to lose.
- bbro
- Member
Offline
- Registered: 10/15/2020
- Posts: 462
Re: Adventures of Home Ownership
Yea, I'm waiting on my brother to come down and bring the dewalt tools I pilfered from my parent's house. I'm pretty sure there's a circular saw in there, too.
Well, very initially, I started with this: but different things kept moving making it not straight
Then, I started with chisels. While I liked it, it was going to take FOREVER, then I remembered, I had some other dremel bits that might work. I ended up using one similar to this:
Worked pretty well. I think on the next ones, I'll try some of the other bits that are similar - get it a little cleaner. Only 4 more to go....
- •
- bbro
- Member
Offline
- Registered: 10/15/2020
- Posts: 462
Re: Adventures of Home Ownership
Some kitchen updates
Before:
First attempt (I ran out of grey primer and didn't realize the white looks like such shit till this picture)
Final attempt. There are still mistakes, but I'm so over it, so it works for now. If I do the other counters, there's definitely some things I would change in the process, but I still like the final outcome
Close up
Before(ish)
After:


I'm tired - lol
- •
- Clodfobble
- Hella Proactive
Offline
- From: Austin, TX
- Registered: 10/13/2020
- Posts: 918
Re: Adventures of Home Ownership
That blue backsplash is pretty!
- bbro
- Member
Offline
- Registered: 10/15/2020
- Posts: 462
Re: Adventures of Home Ownership
Thanks! It was a pain in the ass, but worth it ![]()
- •
- glatt
- TM
Offline
- From: Arlington VA
- Registered: 10/13/2020
- Posts: 1,235
Re: Adventures of Home Ownership
I like that counter paint job. I've never heard of painting a counter, but I don't see why you wouldn't be able to. If it chips or scratches, it's certainly easy enough to repair.
- bbro
- Member
Offline
- Registered: 10/15/2020
- Posts: 462
Re: Adventures of Home Ownership
Thanks! There's a very uneven clear coat on top to, hopefully, prevent scratches and chips. As long as you don't prepare food directly on the counter (I use cutting boards and parchment paper), I'm pretty sure you can use anything. If you do, then I think you'd need to find a food safe top coat. I'm sure they exist....
The oddest thing about the island is that the spatter part was a spray paint too. I found out the hard way it is a WATER SOLUBLE spray paint, so a top coat was a requirement
- •
- xoxoxoBruce
- The Future is Unwritten
Offline
- Registered: 10/15/2020
- Posts: 4,355
Re: Adventures of Home Ownership
Nice, I could keep you busy for a month... or two. LoL
Freedom is just another word for nothin' left to lose.
- bbro
- Member
Offline
- Registered: 10/15/2020
- Posts: 462
Re: Adventures of Home Ownership
LOL - I've got plenty to keep me busy for a while ![]() I think I might replace some lights sooner than I expected. Capping off those wires in the gym gave me some confidence there.
I think I might replace some lights sooner than I expected. Capping off those wires in the gym gave me some confidence there.
- •
- bbro
- Member
Offline
- Registered: 10/15/2020
- Posts: 462
Re: Adventures of Home Ownership
So, I was working on a railing for the porch - something simple, but it was a total fail. I thought I posted about it here, but can't find anything. Anyways, I had some lattice I was going to attach to the posts and some wood that I carved a groove into. Well, the groove wasn't deep enough to hold the lattice like I pictured. Instead of trying to force it into working, I took it down. I still wanted to use the stuff, though, to minimize waste. Well, we had a frog incident with Max. I don't know if it was alive when he tried to swallow it, but it wasn't moving when he hacked it back up in one piece. He found it under a bush that Tess has apparently been working on digging up. So, I figured I'd use the lattice to block that off.
Tess's gardening attempt
Blocked off

I decided to use the supports I carved out to put a barrier around the gas thingy. The big hose reel always ends up smack up against it when the guy comes and mows the lawn. I'm going to move the spikes at the wall in a little more
- •
- xoxoxoBruce
- The Future is Unwritten
Offline
- Registered: 10/15/2020
- Posts: 4,355
Re: Adventures of Home Ownership
One strip of wood the length of that latice will stiffen it up considerably, maybe enough to stay in the grooves.
Freedom is just another word for nothin' left to lose.
- bbro
- Member
Offline
- Registered: 10/15/2020
- Posts: 462
Re: Adventures of Home Ownership
xoxoxoBruce wrote:
One strip of wood the length of that latice will stiffen it up considerably, maybe enough to stay in the grooves.
Everything is already repurposed, so no go. I might see if I can get some books for decks or railing. Or just get a quote and have someone else do it.
Right now, my hurdle is hanging the TV arm. The stud finder and non-contact tester are lighting up on the entire wall as having current. I did some googling and have some ideas on what to try later this week. I'm hoping my brother will be around a few extra days so I can actually get the TV up there, too.
- •
- xoxoxoBruce
- The Future is Unwritten
Offline
- Registered: 10/15/2020
- Posts: 4,355
Re: Adventures of Home Ownership
If there's an outlet in that wall take the plate off and see if it's mounted on a stud, and measure from there. If it's not on a stud you should be able to determine how far it is.
start in a corner, measure out about 14 inches to start, take a very small drill and drill a series of holes along the wall every 1½" at the baseboard until you get wood chips. Then measure from there to find other studs. That location is easy to repair.
Freedom is just another word for nothin' left to lose.
- bbro
- Member
Offline
- Registered: 10/15/2020
- Posts: 462
Re: Adventures of Home Ownership
Nah - just had to unplug everything in that outlet and it stopped lighting up the whole wall. We installed it and the TV is hung. Debating on getting a corner one so the TV can be on a more straight on angle.
- •
- xoxoxoBruce
- The Future is Unwritten
Offline
- Registered: 10/15/2020
- Posts: 4,355
Re: Adventures of Home Ownership
Having anything plugged into the outlet on that wall caused the stud finder to light up everywhere on the wall?
Have you seen Rod Serling in the hood? ![]()
Freedom is just another word for nothin' left to lose.
- bbro
- Member
Offline
- Registered: 10/15/2020
- Posts: 462
Re: Adventures of Home Ownership
@bruce - It's not the stud finder, it was the part that is supposed to find electrical wires so you don't drill into live wires. When I googled, it came up A LOT. So, it seems to be a normal/common thing
- •